In-App Routing with the Navigation System
We recently implemented an in-app routing system to support deep linking for our games.
The main challenge of implementing in-app routing for mobile games is scalability. How do you prevent insane spaghetti code from tangling up your codebase as a result of your foray into deep linking? Can we do away with god classes that contain UI logic for every possible deep link in the game? Oh god, what about the race conditions (especially in games), where the system thinks you’re in one place but the UI is actually in another?
Our solution to this problem led us to develop a hierarchical control system called the Navigation System that is decoupled from UI logic.
Disclaimer: This post assumes basic familiarity with Unity.
Overview
The fundamental idea of the Navigation System is that, given the starting location of the user and a destination location, we should move step-by-step to the destination.
Here’s a visualization of navigation in steps from the Two Dots Home scene to the in-app purchases Market, in the Map scene.
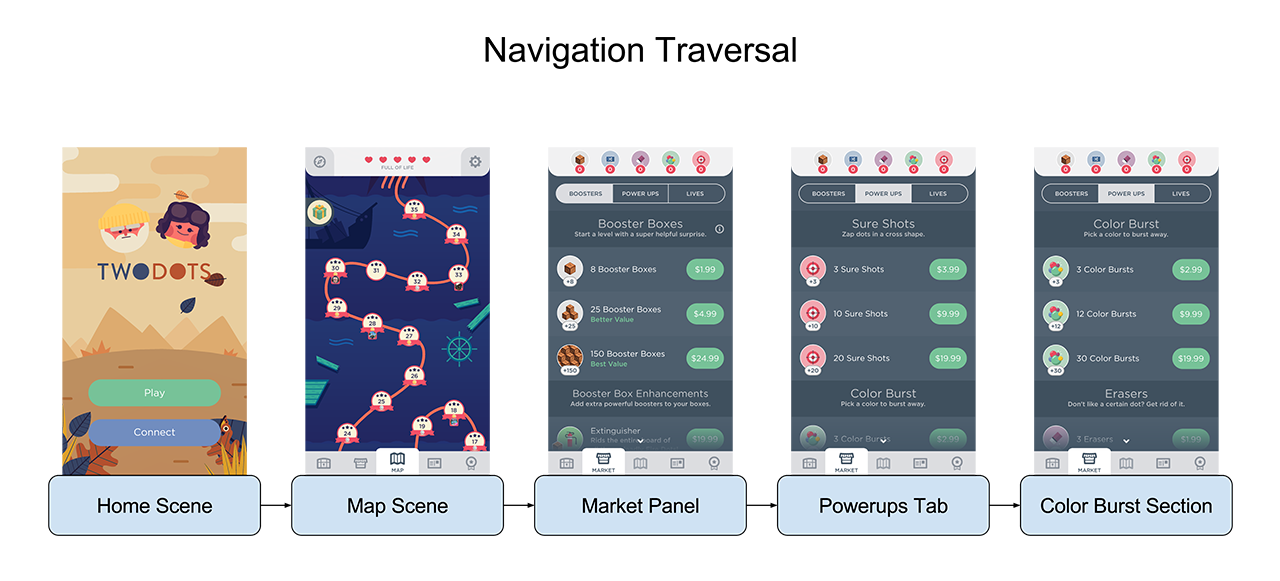
The main issue that we’re solving by moving in steps is race conditions with the UI. Unity scene changes are a good example of this. For instance, between the Home scene and the Map scene, the app needs to wait for a loading screen to complete while the scene changes. There may also be animations that need to complete before the UI is ready to continue to the next step. By navigating step-by-step, we can ensure that for each step we allow the UI to animate, load, or do whatever it needs to do to catch up.
Another huge advantage of going in steps is that we can know all possible paths between all supported locations by defining a hierarchical structure of nodes called the Navigation Tree. More on this later.
If you were just looking for the gist of how in-app routing works with Two Dots, then stop reading, because we’re done. It’s just navigating step-by-step through the app’s UI from start to destination, and waiting for the UI to respond with each step.
However, you may be asking… how does the Navigation System know what steps to take between the start and destination? What is a “Navigation Tree”?
Put on your data structures hat and let’s dive into the weeds…
Internal Navigation Logic
The Navigation Tree
In our project we have an XML data structure called the Navigation Tree that defines the navigation hierarchy for the entire app. This is similar to a sitemap, which serves a similar function for websites.
Here’s a simplified version of the Navigation Tree file for Two Dots.
<Root>
    <Map>
        <Events>
            <EventsTreasureHunts/>
            <EventsExpeditions/>
        </Events>
        <Market>
        ...
        </Market>
        <Achievements/>
    </Map>
    <Game/>
</Root>
Which we can visualize as:
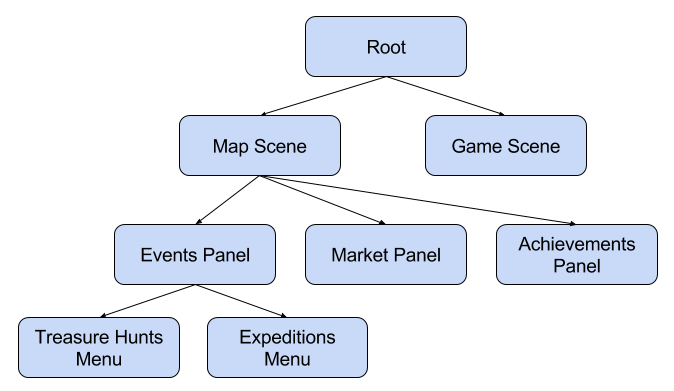
Locations in the app are represented as nodes in the tree. Since the nodes are arranged in a tree, we can find the path between any two nodes by going up and down the tree hierarchy.
Real quick, what’s the difference between a “node” and a “location”? There is no difference. They’re both theoretical “places” inside the app UI that are supported by Navigation. It makes sense to call them nodes when we’re talking in data structures lingo, but locations makes more sense when we’re just trying to use the system to go from point A to point B.
Finding the Path Between Two Nodes
To get the path between any start and destination node in the tree, first we need to find the LCA (Lowest Common Ancestor) between the two nodes, then find the path going up and down the hierarchy that peaks at the LCA. Wait, whaa?
Quick review: The Lowest Common Ancestor of two nodes in a tree is the lowest node, or the furthest node from the root, that is the parent of both nodes.
The reason that the LCA is useful is that, in a tree, the path between 2 nodes will always peak at the LCA of the nodes. That means that, given the LCA, we can build the path in 2 steps.
- Add the nodes from the start node up to the LCA node.
- Add the nodes from the LCA node to the destination node.
A visual example always helps. Let’s say, given the example tree below, we wanted to navigate from the Treasure Hunts Menu node to the Achievements Menu node. Here’s a visualization of how we would find the path between those two nodes using the LCA:
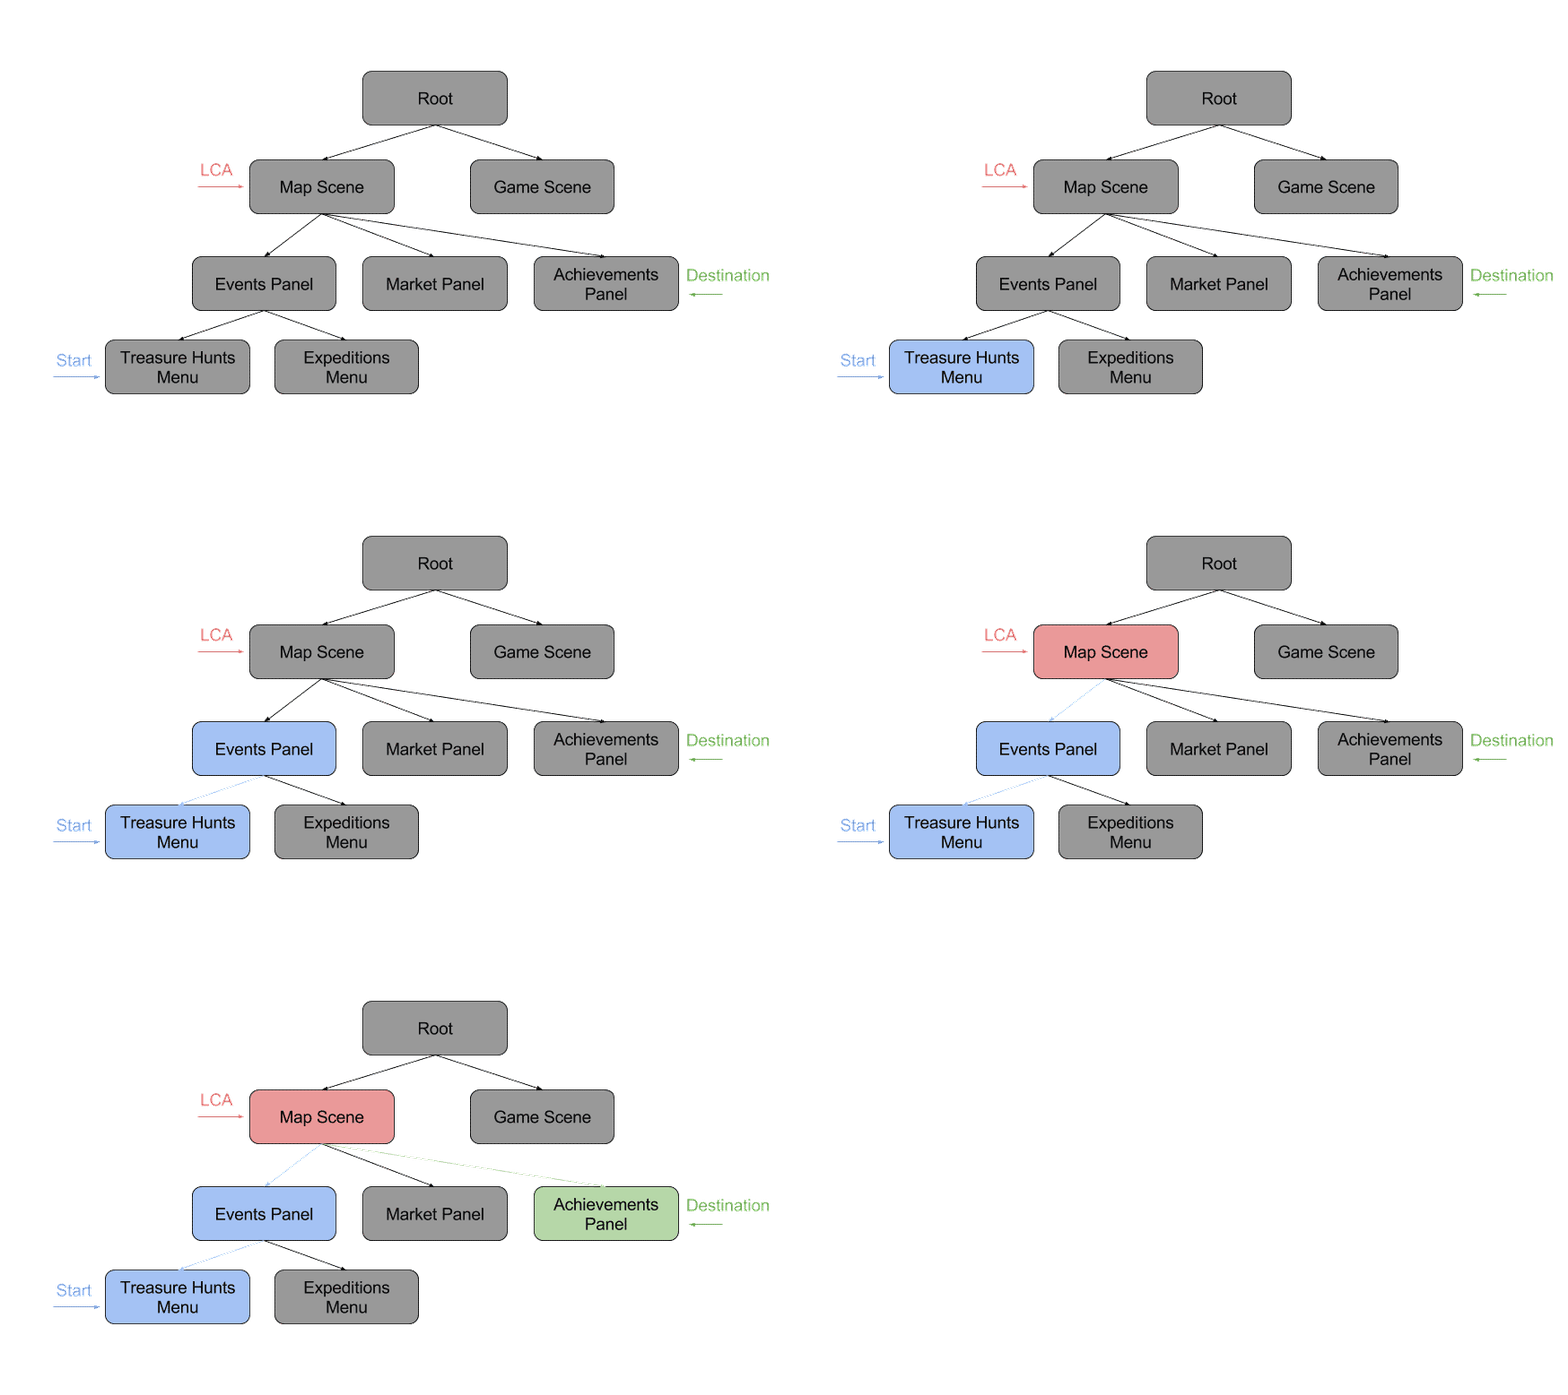
The blue nodes represent step 1, where we are “climbing” the tree. The red and green nodes represent step 2, where we are “descending” the tree. Add the nodes together and we get the path between the start and destination node!
Using this algorithm, we can find the path between any two nodes in the tree. We then execute a traversal through that path, evaluating each node in the path in sequence.
Great, we now have a system that traverses through hypothetical nodes that represent locations in the UI. Next we need to make the real UI respond to the traversal (changing scenes, tweening animations, and scrolling).
Communicating With The UI
The INavigationResponder Interface
The Navigation System itself is completely decoupled from UI logic. Therefore, to allow the UI to respond to a traversal, the system provides the ability for UI “responders” to execute logic when nodes are evaluated.
This is done through the INavigationResponder interface.
The idea is that UI responder classes implement the interface and associate themselves as responders to specific nodes on the Navigation Tree. When an associated node is evaluated in a traversal, it emits events to the responder which triggers the responder’s UI logic to be executed.
Best of all, the interface defines events in the form of Unity Coroutines, which allows the responders to actually pause the traversal while the UI is animating a transition, or loading a scene, etc. This is how we can avoid race conditions, because INavigationResponder allows UI responders to force the Navigation System to be synchronized with the UI.
Here’s the definition for the interface:
public interface INavigationResponder
{
    // called when the node, or location, is entered,
    // meaning that the traversal is going "down" the tree
    IEnumerator OnEnter(NavigationLocationIdentifier locationIdentifier);

    // called when the node is left, meaning that the traversal is going
    // "up" the tree
    IEnumerator OnLeave(NavigationLocationIdentifier locationIdentifier);

    // ignore this for now, it's a long story
    bool IsCurrentUserFlowLocationCandidate(NavigationLocationIdentifier locationIdentifier);
}
The distinction between going up versus going down the tree is important. When we are “entering” a node, or going down the hierarchy, we usually want the UI responders to perform initialization logic in the UI (instantiate a prefab, reset fields, etc.). When we are “leaving” a node, or going up the hierarchy, we usually want to deinitialize the associated UI (destroy the instantiated prefab, clear a cache, etc.).
Here’s an example of how we might implement the UI responder for the Event node.
public class UIMapPanelManager : MonoBehaviour, INavigationResponder
{
    private Prefab<EventsPanel> _eventsPanelPrefab;

    public IEnumerator OnEnter(NavigationLocationIdentifier locationIdentifier)
    {
        if (locationIdentifier == NavigationLocationIdentifier.Events)
        {
            // instantiate and initialize the events panel
            var eventsPanel = _eventsPanelPrefab.Instantiate<EventsPanel>();
            yield return StartCoroutine(eventsPanel.InitCoroutine());
        }
    }

    public IEnumerator OnLeave(NavigationLocationIdentifier locationIdentifier)
    {
        if (locationIdentifier == NavigationLocationIdentifier.Events)
        {
            var eventsPanel = _eventsPanelPrefab.Instance;

            if (eventsPanel != null)
            {
                // destroy the events panel
                yield return StartCoroutine(eventsPanel.DestroySelfCoroutine());
            }
        }
    }

    // ...
}
The OnEnter implementation instantiates and initializes an instance of the EventsPanel prefab when a Navigation System traversal enters the Events node. If the initialization of the panel takes more than a frame (maybe it’s an events panel that animates in), then we would yield on InitCoroutine.
The OnLeave implementation destroys the instance when a traversal leaves the Events node. If we need to wait for the UI to animate out before destroying the instance, then we would yield on DestroySelfCoroutine.
And that’s pretty much it! Once all nodes in the Navigation Tree have responders associated with them, we’ve completed our implementation of in-app routing, and traversals between any two nodes will be synchronized with the actual UI of the app.
So… what about that last member on the INavigationResponder interface, IsCurrentUserFlowLocationCandidate?
Determining the Start Location of a Navigation Traversal
Well, the truth is, we’ve left out a crucial fundamental question for Navigation, which is how do we get the starting node for traversals? The destination is given by the deep link, but the starting node will always depend on the current state of the app UI. But how do we extrapolate the node that represents the current UI?
The idea of IsCurrentUserFlowLocationCandidate is that the deepest node in the Navigation Tree whose responder considers itself to be active should represent the current state of the app UI.
Let’s say, for example, that the user has currently opened the Treasure Hunts menu, and we want to determine which node in the Navigation Tree corresponds to their app UI state. Here’s a visualization of how we would find their current node:
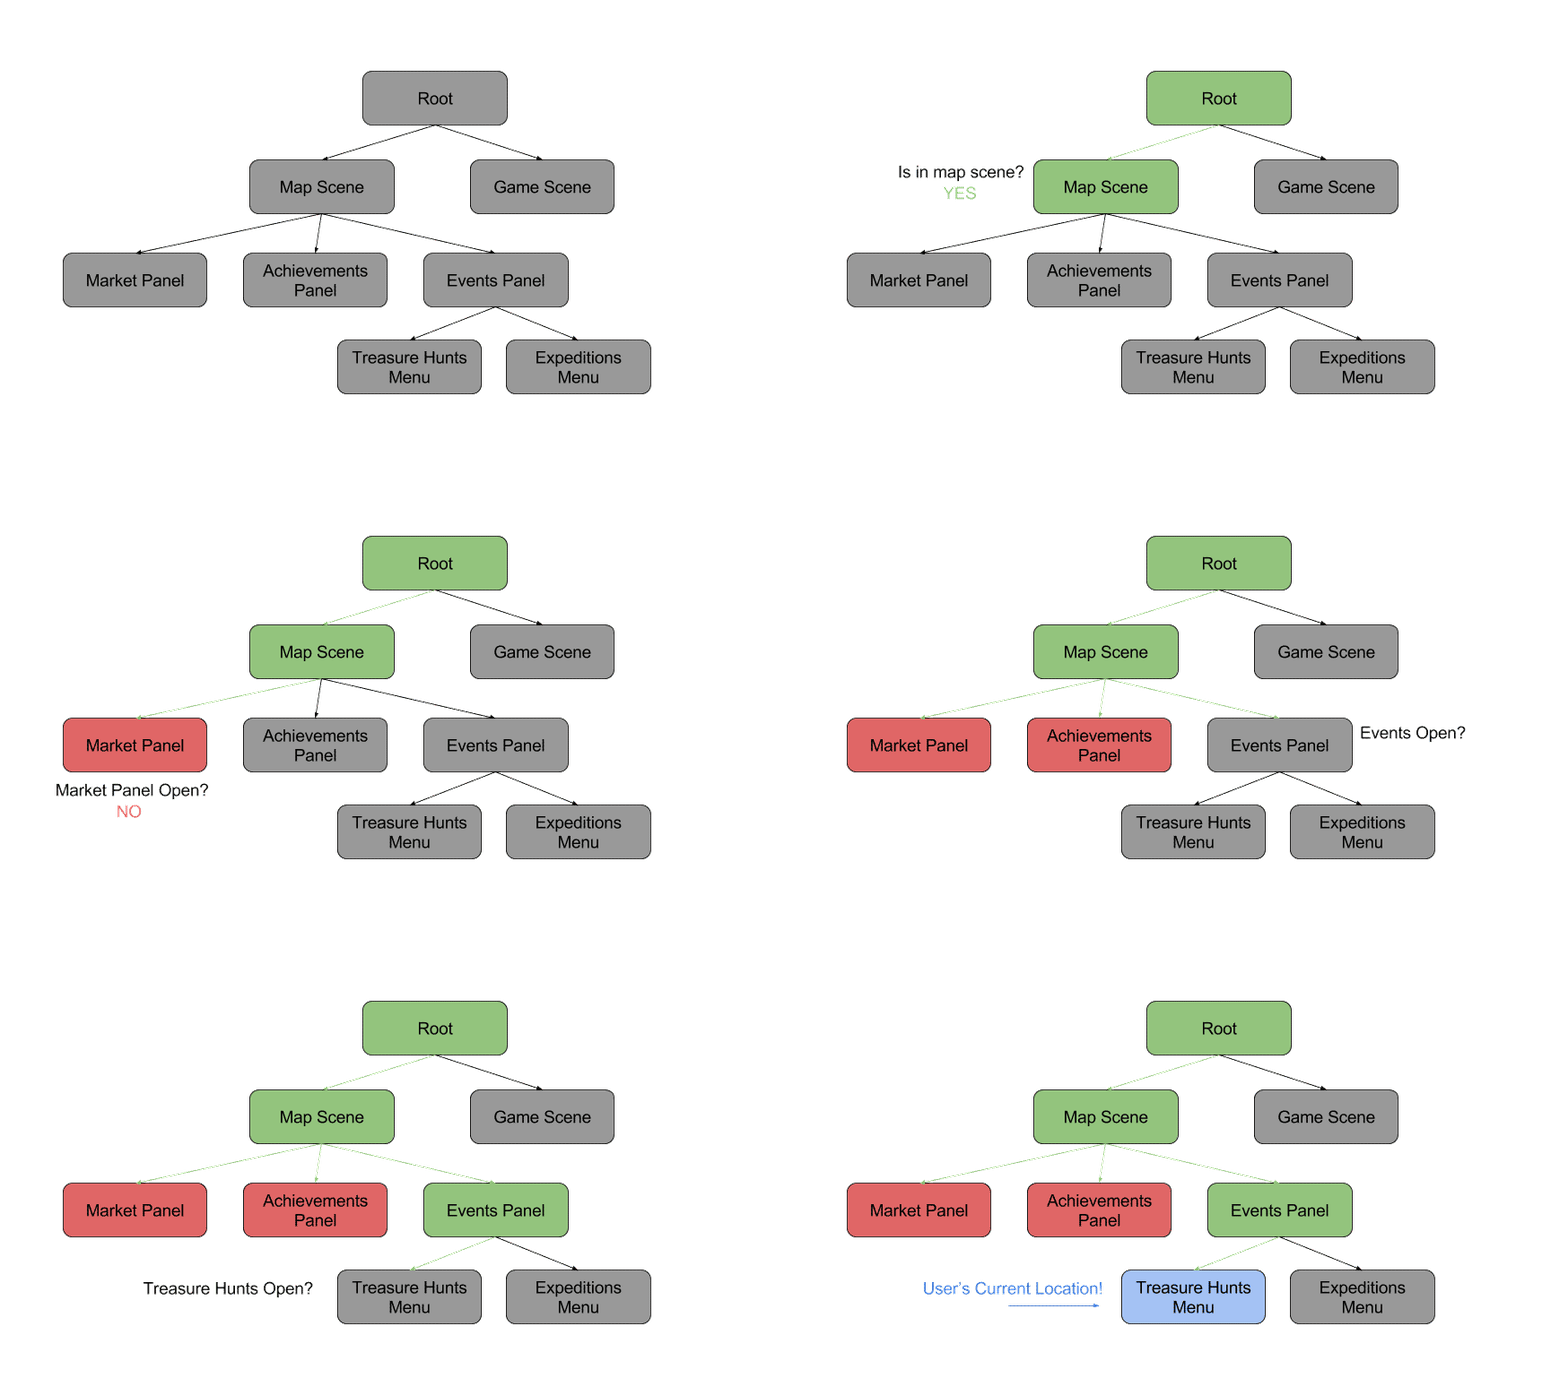
We stop at the deepest active node which considers itself active, and mark that as the user’s current node. The beauty of the Navigation Tree is that, if a node in the tree is active, we can consider all the parents of that node to also be active (if we are in the Treasure Hunts menu, then we’re also in the Events Panel, and we’re also in the Map scene). Therefore, we can say that the deepest active node most closely represents the current state of the app UI.
Once we’ve determined the user’s current node, we can use that node as the starting node for a navigation traversal!
Limitations
#HierarchyProblems
With all the benefits of a hierarchical system, there are also limitations, especially for flexibility. In a tree, we expect that there is only one path between any two given nodes, which becomes confusing when multiple start locations need to be able to navigate to the same end UI.
An example is a settings menu that can be navigated to from multiple places inside the app. The Navigation System does not support multiple paths nodes, so we would have to create two nodes that are responded to by the settings menu UI responder.
Here’s a visualization of what that would look like.
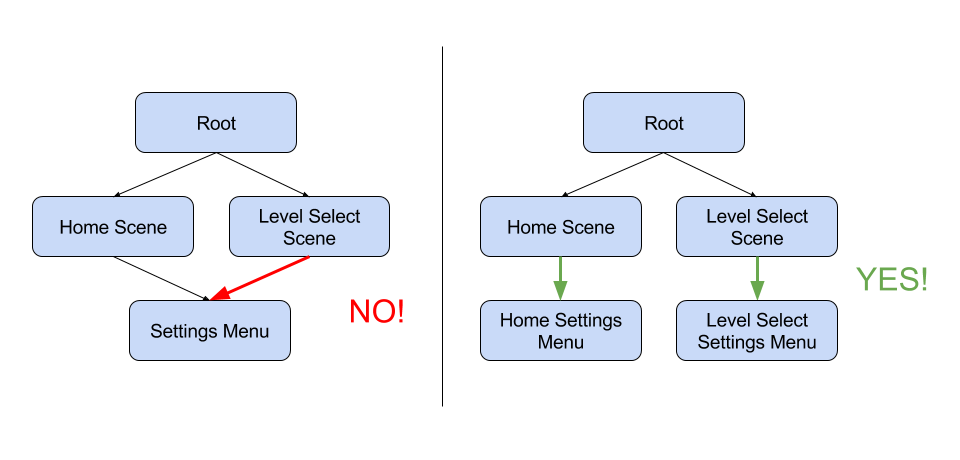
About Those God Classes…
Speaking of responders that handle multiple nodes, it’s very easy to abuse the node -> responder system by having responders that handle too many nodes. One of the goals of the Navigation System is to encourage decoupling of UI classes, but it doesn’t disallow a god class that responds to every single unrelated node in the Navigation Tree. Therefore, it’s important to be mindful of the coupling of existing UI code before implementing that code as Navigation responders.
This problem is especially present with apps that have “flatter” hierarchies. For example, we might have the following Navigation hierarchy:

We could have a giant manager class for the UI that handles navigation logic for all child nodes of Root.
public class UIManager
{
    public override IEnumerator OnEnter(NavigationLocationIdentifier location)
    {
        switch (location)
        {
            case NavigationLocationIdentifier.News:
                // handle instantiating and initializing the news panel...
                break;
            case NavigationLocationIdentifier.Games:
                // handle instantiating and initializing the games panel
                break;
            case NavigationLocationIdentifier.Music:
                // ...
                break;
            case NavigationLocationIdentifier.Market:
                // ...
                break;
            case NavigationLocationIdentifier.Friends:
                // ...
                break;
            case NavigationLocationIdentifier.Profile:
                // ...
                break;
            case NavigationLocationIdentifier.Settings:
                // ...
                break;
        }
    }
}
However, a cleaner, more decoupled, and generally less insane method is to move the dependencies for those UI elements into their own classes.
public class UINewsPanelController
{
    public override IEnumerator OnEnter(NavigationLocationIdentifier location)
    {
        // handle instantiating and initializing the news panel...
    }
}

// remember to move these classes into their own files!
public class UIGamesPanelController
{
    public override IEnumerator OnEnter(NavigationLocationIdentifier location)
    {
        // handle instantiating and initializing the games panel...
    }
}

// and so on...
Using switch statements to handle related nodes in a responder works well. However, giant switch statements that handle unrelated nodes leads to god classes that will likely make life miserable for everyone.
All That Logic…
There’s a lot of logic going on under the hood, and setup is required in terms of defining the navigation hierarchy. However, once the Navigation System is set up, we can now simply navigate from any starting location in the app to any location in the Navigation hierarchy given a deep link in the form of a URL or a NavigationLocationIdentifier value:
Navigation.StartTraversal(NavigationLocationIdentifier.MyAwesomeNewFeature);
Woot!